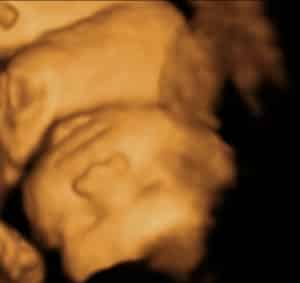
How to Perform 4D Ultrasound for “Babyface” Imaging
Of all the topics I have covered in my videos, this one is of the top-viewed of all time. I know exactly why: 4D ultrasound concepts can be a difficult process for both new and experienced sonographers.
Over the last 21 years, I have trained hundreds of people in 4D ultrasound. Some were experienced sonographers and physicians, and others had barely used an ultrasound before. With the variety of people that I've trained, I have not found that experience, degree, or general intelligence can predict how quickly a user will grasp 4D ultrasound imaging.
Simply put, 4D imaging is not easy, and the only way to learn it is practice, practice, practice. Since we all have to start somewhere, I have built a guide that will give you the right foundation to start perfecting your 4D imaging.
A few notes before moving forward. First, this guide cannot replace applications training. Second, this guide is written for someone who has a basic knowledge of their ultrasound machine. If you are not familiar with your ultrasound machine, it will be difficult for you to follow these steps. While I use the Voluson for the screenshots, the principles that apply here work for any 4D ultrasound.
Step 1: Perfect your 2D Image
A 4D image must start with a good 2D image. Fortunately, every ultrasound will have settings that magically (and automatically) optimize your machine for an optimal 2D image. These all start with choosing the right "preset" for your probe.
To find these presets, first select your probe and select the Obstetric setting. From there, you should see a label that indicates a general OB setting for 20+ weeks, like “2-3 Trimester” or “Mid-Pregnancy." For most 4D scans, you'll want to choose one of these presets for an optimal starting point.
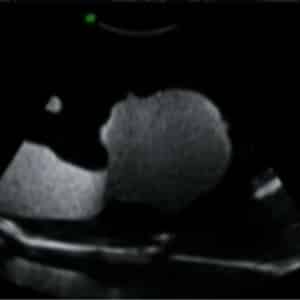
Begin with a good 2D image
Now, you'll want to capture a good 2D image of the baby's profile.
Often, the best angle for a baby's face is by positioning the probe near the pelvic bone on the left or right side, not from the middle of the belly. Once positioned near the pelvic bone, pretend you’re aiming a flashlight towards the cervix by angling the probe head towards the cervix. If you see the spine, you’ll need to angle the probe from the other side (i.e. right pelvic to left pelvic or vice versa).
Gain Control: Capturing a quality 2D image includes cleaning up the image by adjusting the Gain. The Gain is essentially the brightness of the ultrasound image. Too little gain produces a very dark image. On the other hand, too much gain will give you a “fuzzy” image.
On some ultrasounds, the Gain control is a 2D knob that you twist. On other ultrasound machines, it’s indicated as “2D”, “B”, or “Gain”. Keep slowly adjusting the knob until you find that happy medium to provide a contrast between the dark fluid and a light face.

What is considered a "good" 2D image for 4D imaging? The best 2D image for a good “babyface” image has the following characteristics:
- The baby’s profile is facing the probe. Meaning, the baby's nose should be pointing upwards. A common mistake made by even experienced sonographers is to show the two orbits of the eyes on the 2D image. When that's converted to 4D, it will actually produce a picture of the baby's ear. That is because it is rendering an image of the side of the baby’s face (profile).
- There is fluid in front of the baby’s face.
- There are no obstructions in front of the baby’s face. Anything that is in front of the baby's face will likely become part of the 4D image.
- There aren’t hands, arms, or feet in the area. Ultrasound waves can’t penetrate bone very well and will show up as a shadow on the baby's face. Depending on the appendage and angle, it may even block the image of the face entirely.
If you're unable to meet these characteristics for a good 2D image, you will need to ask the baby to move its position. Just kidding. It is okay if you cannot meet all of these criteria. What I'm helping you do is eliminate as many obstructions as possible.
Step 2: Correctly Setting the Region of Interest/Render Box
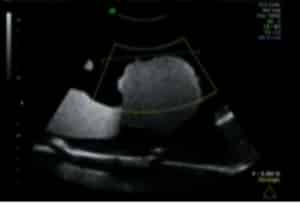
When you first enter 4D, you'll see a convex box that appears. That is your Region of Interest. In this mode, you will have a 2D image on the screen along with a convex outline over the image as shown in this image. You’ll be able to adjust the size and position of this overlay.
The box pictured here is the Region of Interest box, most often referred to as "ROI". The concept of the Region of Interest box is simple: Everything inside the box will appear in 4D. Everything outside the box will be eliminated from the 4D view. Therefore, the box MUST be set in a good position to capture a good image.
Region of Interest Box
When you first enter 4D, you'll see a convex box that appears. That is your Region of Interest. In this mode, you will have a 2D image on the screen along with a convex outline over the image as shown in this image. You’ll be able to adjust the size and position of this overlay.
The box pictured here is the Region of Interest box, most often referred to as "ROI". The concept of the Region of Interest box is simple: Everything inside the box will appear in 4D. Everything outside the box will be eliminated from the 4D view. Therefore, the box MUST be set in a good position to capture a good image.
Also, note the horizontal line across the top of the box. This line is what you’ll use to separate the face from any obstruction, such as the placenta or uterus because the machine will also exclude anything above that line. I recommend that you place this line just above the baby’s nose.
You’ll also have an option to change the size of the Region of Interest box. Most of the time, you'll want to set the depth to the back of the head and make sure the width of the box encompasses everything that you want in the image.
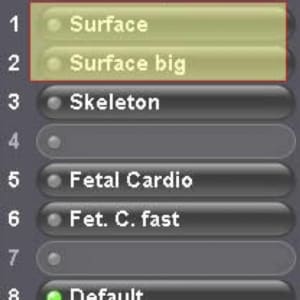
Step 3: Check Your Presets
If your machine has presets for 4D mode, it's your lucky day. Not all machines do, so check yours for a setting that will perform “surface” rendering. This preset will optimize your image for surface rendering, which will provide the best 4D babyface image possible.
Once you’ve selected the correct preset and have your ROI (Region of Interest) Box set appropriately, you are ready to enter Live (4D) mode.
Step 4: Re-Gain Control
The first thing to do when entering 4D mode is to adjust the Gain. Most often you’ll find that you need to eliminate artifact in the image by adjusting to a lower Gain. By lowering the Gain, you’ll eliminate the weak echoes (artifacts) and the face will appear more clearly. When the Gain is high (bright), the machine will clearly display the small artifacts. If the image is instead too dark, you’ll want to slowly increase the Gain to make the face appear.
Your technique is key! It takes time for the machine to render an image, so you need to adjust the gain slowly. I recommend pausing after each adjustment to wait for the on-screen image to catch up. Otherwise, you could turn too quickly and see a very dark or bright image.
Step 5: Invert the Image (Maybe!)
Whether to invert or not is dependent upon the baby’s position and the probe orientation.
For example, if you don’t see what you’re looking for, the baby may be in the vertex position. Since the baby's face is upsidedown in this case, inverting the image will create a normal-looking image.
Another example is that I’ve seen is those who hold the probe upside-down. This is a big no-no in diagnostic ultrasound because it doesn't provide the proper orientation. This is not a good habit and makes your 2D scans more difficult.
Step 6: Make Adjustments in 2D, not 4D
No matter your experience level, it is a lot easier to find the baby and get a position in 2D rather than searching in 4D. Repositioning in 4D is less efficient because of the Region of Interest (ROI) box and the slower rendering times. 2D is the best place to find a better position, so return to 2D often to make adjustments for better angles or for the baby's movement.
Step 7: Always Optimize
Even with the perfect positioning of the baby and magical factory defaults, you could still capture a poor image. It’s crucial to get proper settings to allow the machine to render the best 4D images possible, and although convenient, often factory default settings aren't very good. This is a technical issue that will be addressed in another article, but it’s important that you get to know your machine and learn what controls achieve the best 4D image quality.
This is part two of a multipart series on 4D ultrasound machines setup and usage. Check our blog for more on 4D Ultrasound Imaging!
Back to the 4D Basics
Need a refresher? 4D ultrasound imaging concepts can be difficult for new and experienced ultrasound technicians alike. It requires the technician to consider how the ultrasound “sees” differently. Because of that, I have even found that experienced sonographers have more difficulty understanding 4D imaging.
Since there are not many resources to help, I made a free blog and a video that explain the basic concepts of 4D ultrasound imaging that you can find in our guides.
About the Author
Brian Gill is Probo Medical’s Vice President of Marketing. He has been in the ultrasound industry since 1999. From sales to service to customer support, he has done everything from circuit board repair and on-site service to networking and PACS, to training clinicians on ultrasound equipment. Through the years, Brian has trained more than 500 clinicians on over 100 different ultrasound machines. Currently, Brian is known as the industry expert in evaluating ultrasounds and training users on all makes and models of ultrasound equipment, this includes consulting with manufacturers with equipment evaluations during all stages of product development.